

Happy Halloween! Whether you're dressing up and going out or staying home in your comfy clothes, I hope you love this Halloween Oreo red velvet cake! The cake is paired with a black cream cheese frosting which is a perfect duo. The frosting is made with black cocoa powder which actually makes things taste a lot like Oreos. Since this is a cream cheese frosting, the combination of the black cocoa powder with the cream cheese, gives the frosting an Oreo taste. I personally don't get very into the dress up part of Halloween but I love the treat making part of Halloween so I had a ton of fun getting to decorate this spooky cake!
Ingredient Highlights:
- Black Cocoa Powder. I personally use Wincrest black cocoa powder for this recipe. Black cocoa powder helps getting the frosting to dark black color as well as gives it that Oreo taste that makes it tie in so well with the cake.
- Cake Flour. Cake flour has a lower protein content level than traditional flour and helps give the cake a delicate, soft texture. There are substitutes for cake flour that you can try but I recommend the real thing for best results!
Tools to Make This Recipe:
- Stand Mixer. You will need this to mix the cake batter as well as the frosting. I have owned both tilt head mixers and bowl lift mixers from Kitchenaid and I prefer the bowl lift option. It seems more stable to me when mixing thicker doughs (although that doesn't matter for this specific recipe).
- Cake Pans. I used 6" cake pans for this recipe. I use Wilton brand cake pans.
- Cake Boards. This cake is pretty heavy and I regret not using a heavier duty cake board. The rounds that I used were very thin, carboard ones will work but I also recommend using a thicker one to make this easier and more stable.
- Turn Table. I have a very basic Wilton brand turntable but if I'm being honest, I'd like to get a new one. The one I have works great but I am considering buying this turn table which also comes with some other cake decorating supplies.
- Cake Comb. I bought this set of cake combs from Amazon and they work great! I used the flat edge one for this cake. The thing that I love about these cake combs is how well they hold heat. I like to place the combs in hot water before doing the final few passes to get the frosting smooth! These hold that heat really well to make the frosting as smooth as possible!

Cake Decorating Instructions:
Making this Halloween Oreo Red Velvet cake was a bit of a process but it was so much fun and it came out great! I wanted to provide step-by-step instructions on how I created this Halloween cake:
-
- Bake the cake according to the recipe. I baked the cake the night before decorating it. I always do this with my cakes so I can ensure they cool properly. It's important to have the cake layers chilled before assembling. Otherwise, it will be a bit unstable and hard to decorate. Once the cakes are cooked and have cooled a little bit at room temperature, run a knife around the edge of the cake to make sure it doesn't stick to the pan. Dump the cake out onto a cooling rack. Flip the cake over so the top is facing up again and use a bread knife or a cake leveler to level the cake. It's important to get the cake as level as possible so it stacks nicely when you go to decorate it. Once the cakes are leveled, wrap them in plastic wrap and store them in the refrigerator or freezer until you are ready to use them. It's important that the wrap on the cake is airtight but not to tight that it will affect the roundness of the cake layers.
- Make the frosting. I made the frosting in the morning so it could set for a little while and allow the color to deepen to a darker black.
- Make the bloody eyeballs. To make the bloody eyeballs, I started with eyeball sprinkles. I then mixed red luster dust with vodka to make it into a paint. I then used a food safe paint brush to brush the red onto the eyes. Once you are happy with how the eyes look, set them aside to dry.
- Create the skulls. I used similar silicone ice cube molds to make the skulls. The skulls are made with white candy melts and were created the same way that you would an ice cube with the mold. I only had one mold so it was quite the process of filling the mold, freezing the chocolate, and removing the chocolate from the mold. The chocolates would then have to be re-melted before filling the mold again. I made five skulls in total so if you want to do them all at once and plan to make a 6" cake, I recommend buying enough of the molds that you don't have to re-melt the chocolate. Once the skulls are ready, you can place candy eyeballs on them if you'd like. I thought that the eyeballs were a fun addition to the skulls!
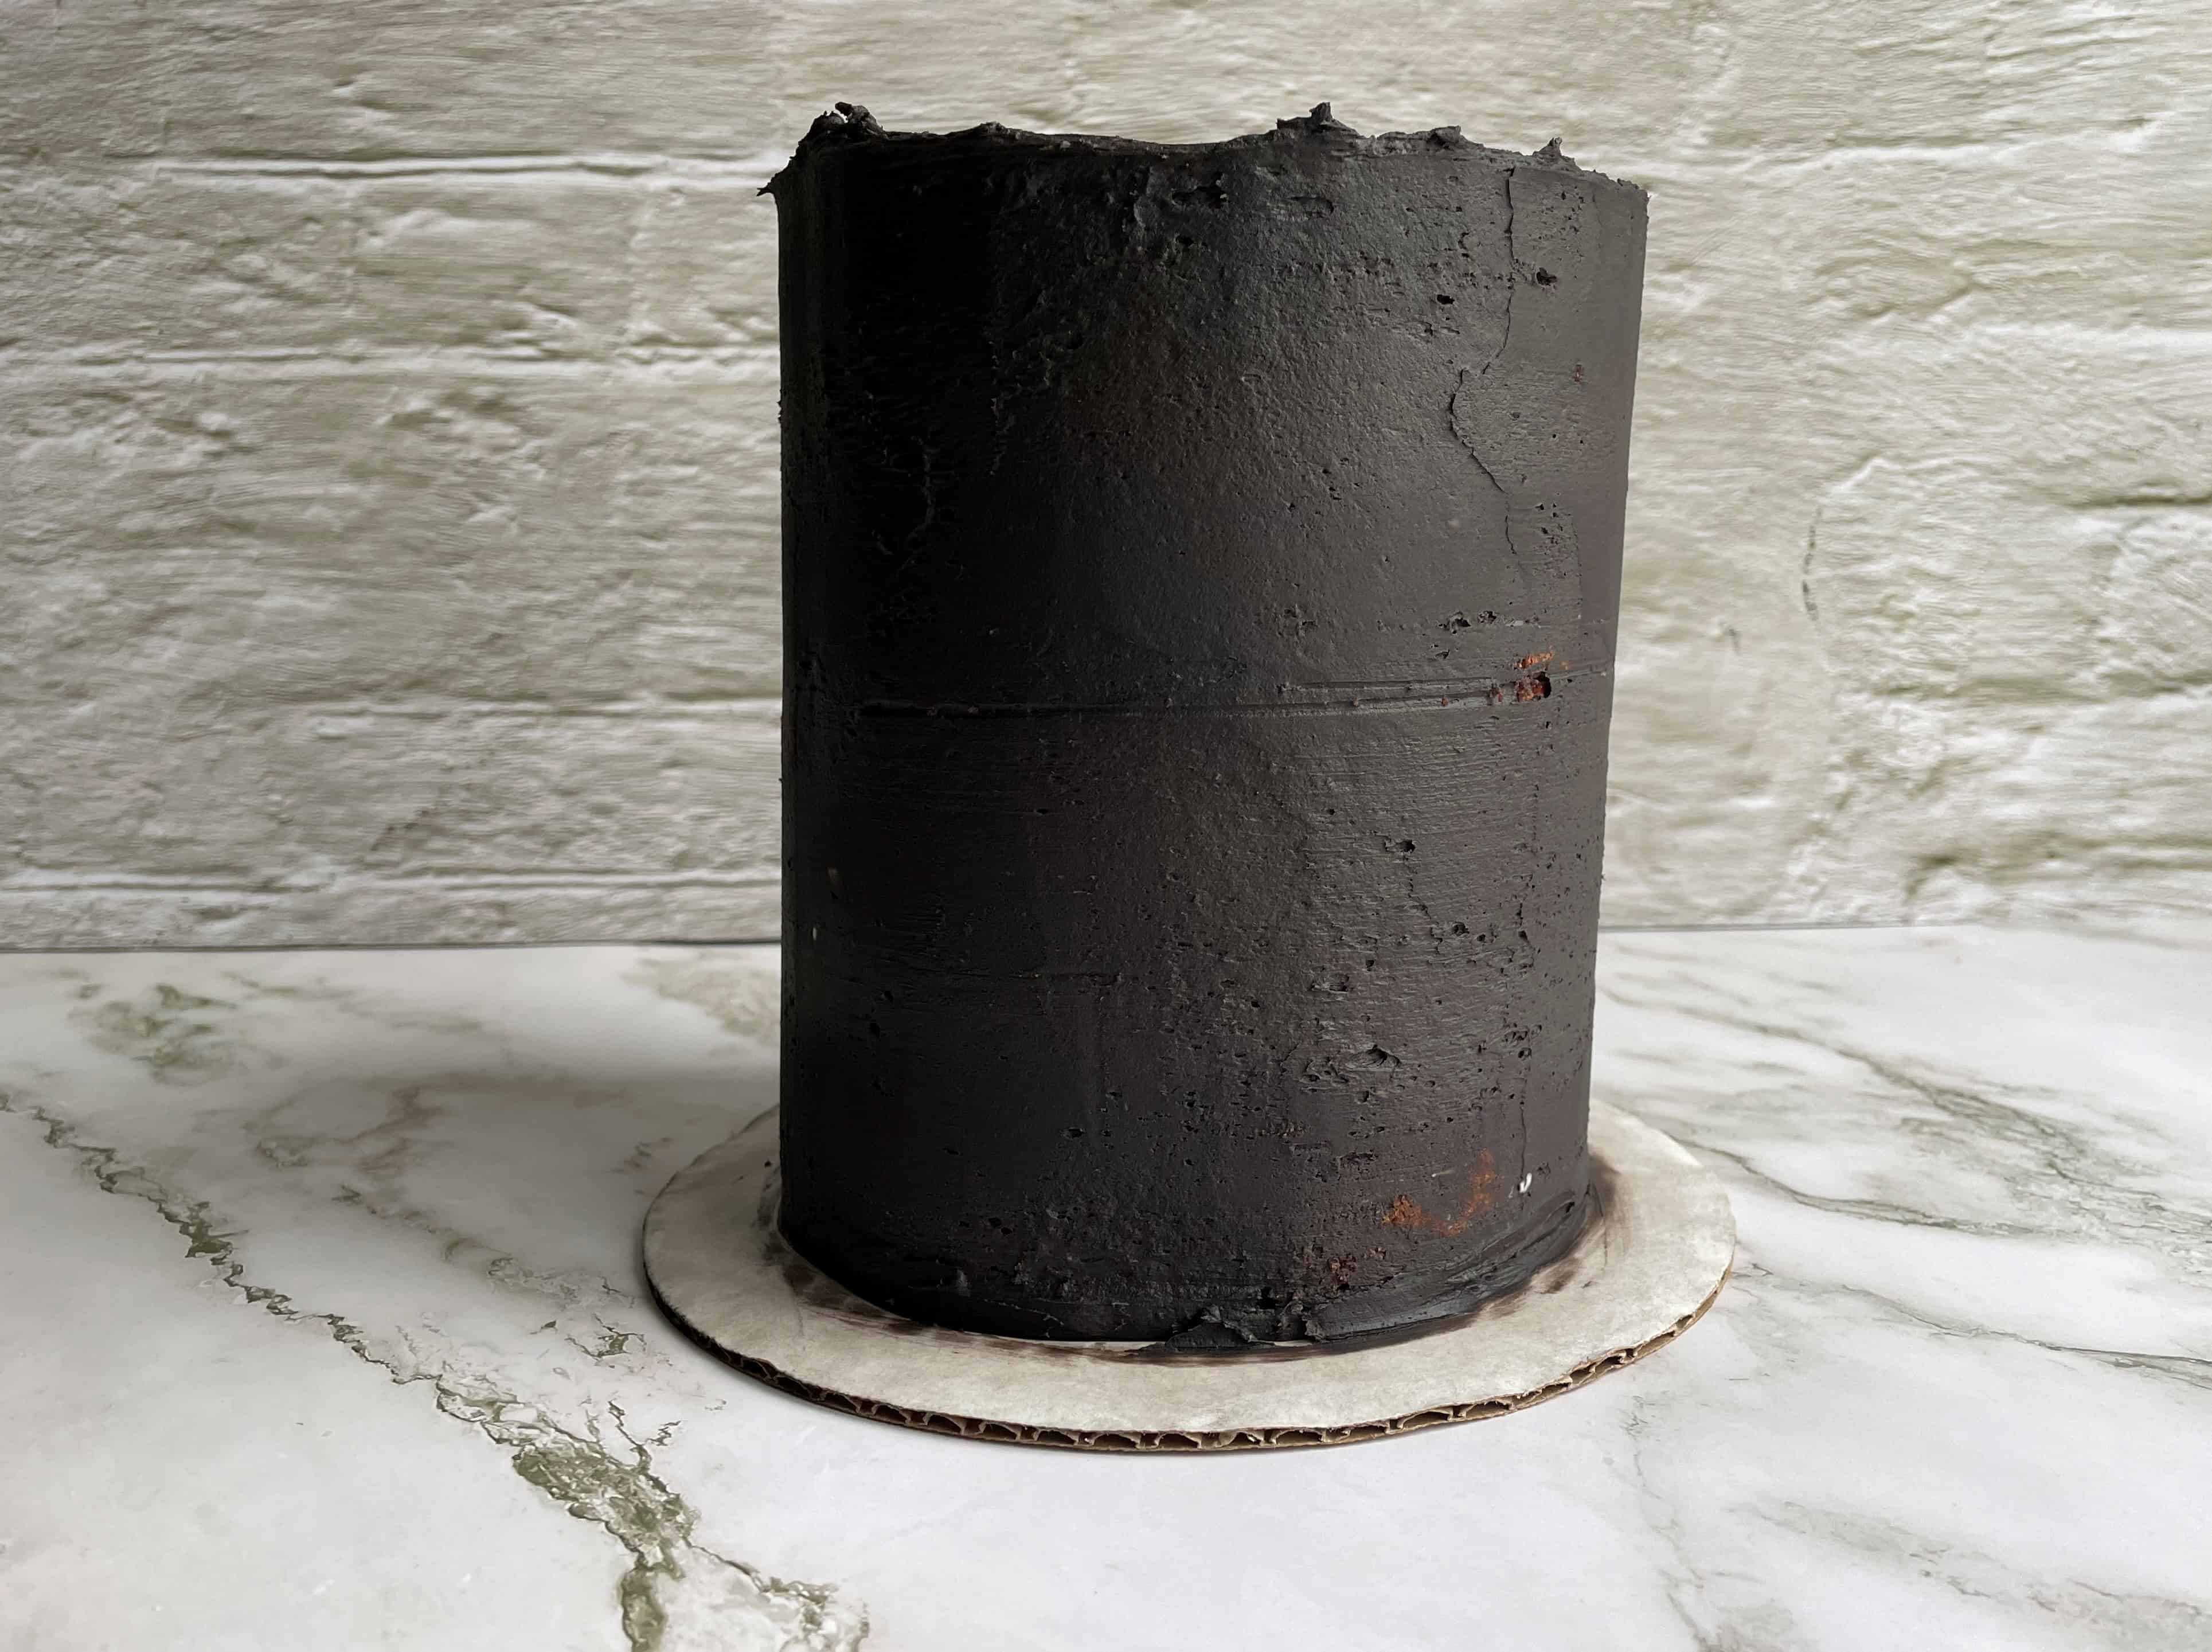
- Stack and crumb coat cake. Stack your cake on a cake board with a layer of frosting between each layer of cake. Cover the outside of the cake with a thin layer of frosting and scrape cake with cake comb to get a nice, smooth layer of frosting around the cake. Smooth the frosting on the top of the cake. This first pass doesn't have to be perfect. You'll do your final layer of frosting later. Place the cake in the refrigerator to set.
- Place the eyeballs on the cake. Position the eyeballs around the cake for the "fault line". It is up to you how much of a "fault line" you are wanting for your cake and where you want it. I placed 3 rows of eyeballs around the cake and I roughly centered them. Once you're happy with where you have the eyeballs, you're ready to frost the cake.
- Frost the cake. Frost the cake on the top and bottom (or where you're eyeballs aren't placed). Once you have these areas covered in frosting, it's time to smooth out the frosting. Using a cake comb, work your way around the cake until the frosting is smooth. I do this until the frosting is close to being perfectly smooth. Once it's to the point where you don't think it will get any smoother, place your cake comb in a thing of hot water. Allow it to absorb that heat and then wipe it down with a paper towel before running it around the cake again. Scrape the frosting off of the cake comb before repeating the process of heating it up and going around the cake. This allows you to get that perfectly smooth frosting. Place the cake back in the refrigerator.

- Make the chocolate ganache. To make my chocolate ganache, I melted one package of red candy melts with ½ cup of heavy whipping cream. This was way more than I needed so I'd recommend cutting this amount in half. Once the cake is thoroughly chilled, you can do the drip on the cake.
- Create drip on cake. I like to use a piping bag to do drips. When I created this drip, I started by grabbing an extra cake board and rotating the cake 180°. I then did part of the drip around the eyeballs before rotating the cake right-side up again. Remove the cake board that you just placed on the top and do the other drip near the eyes as well as on the top of the cake. Place cake back in the refrigerator to chill.
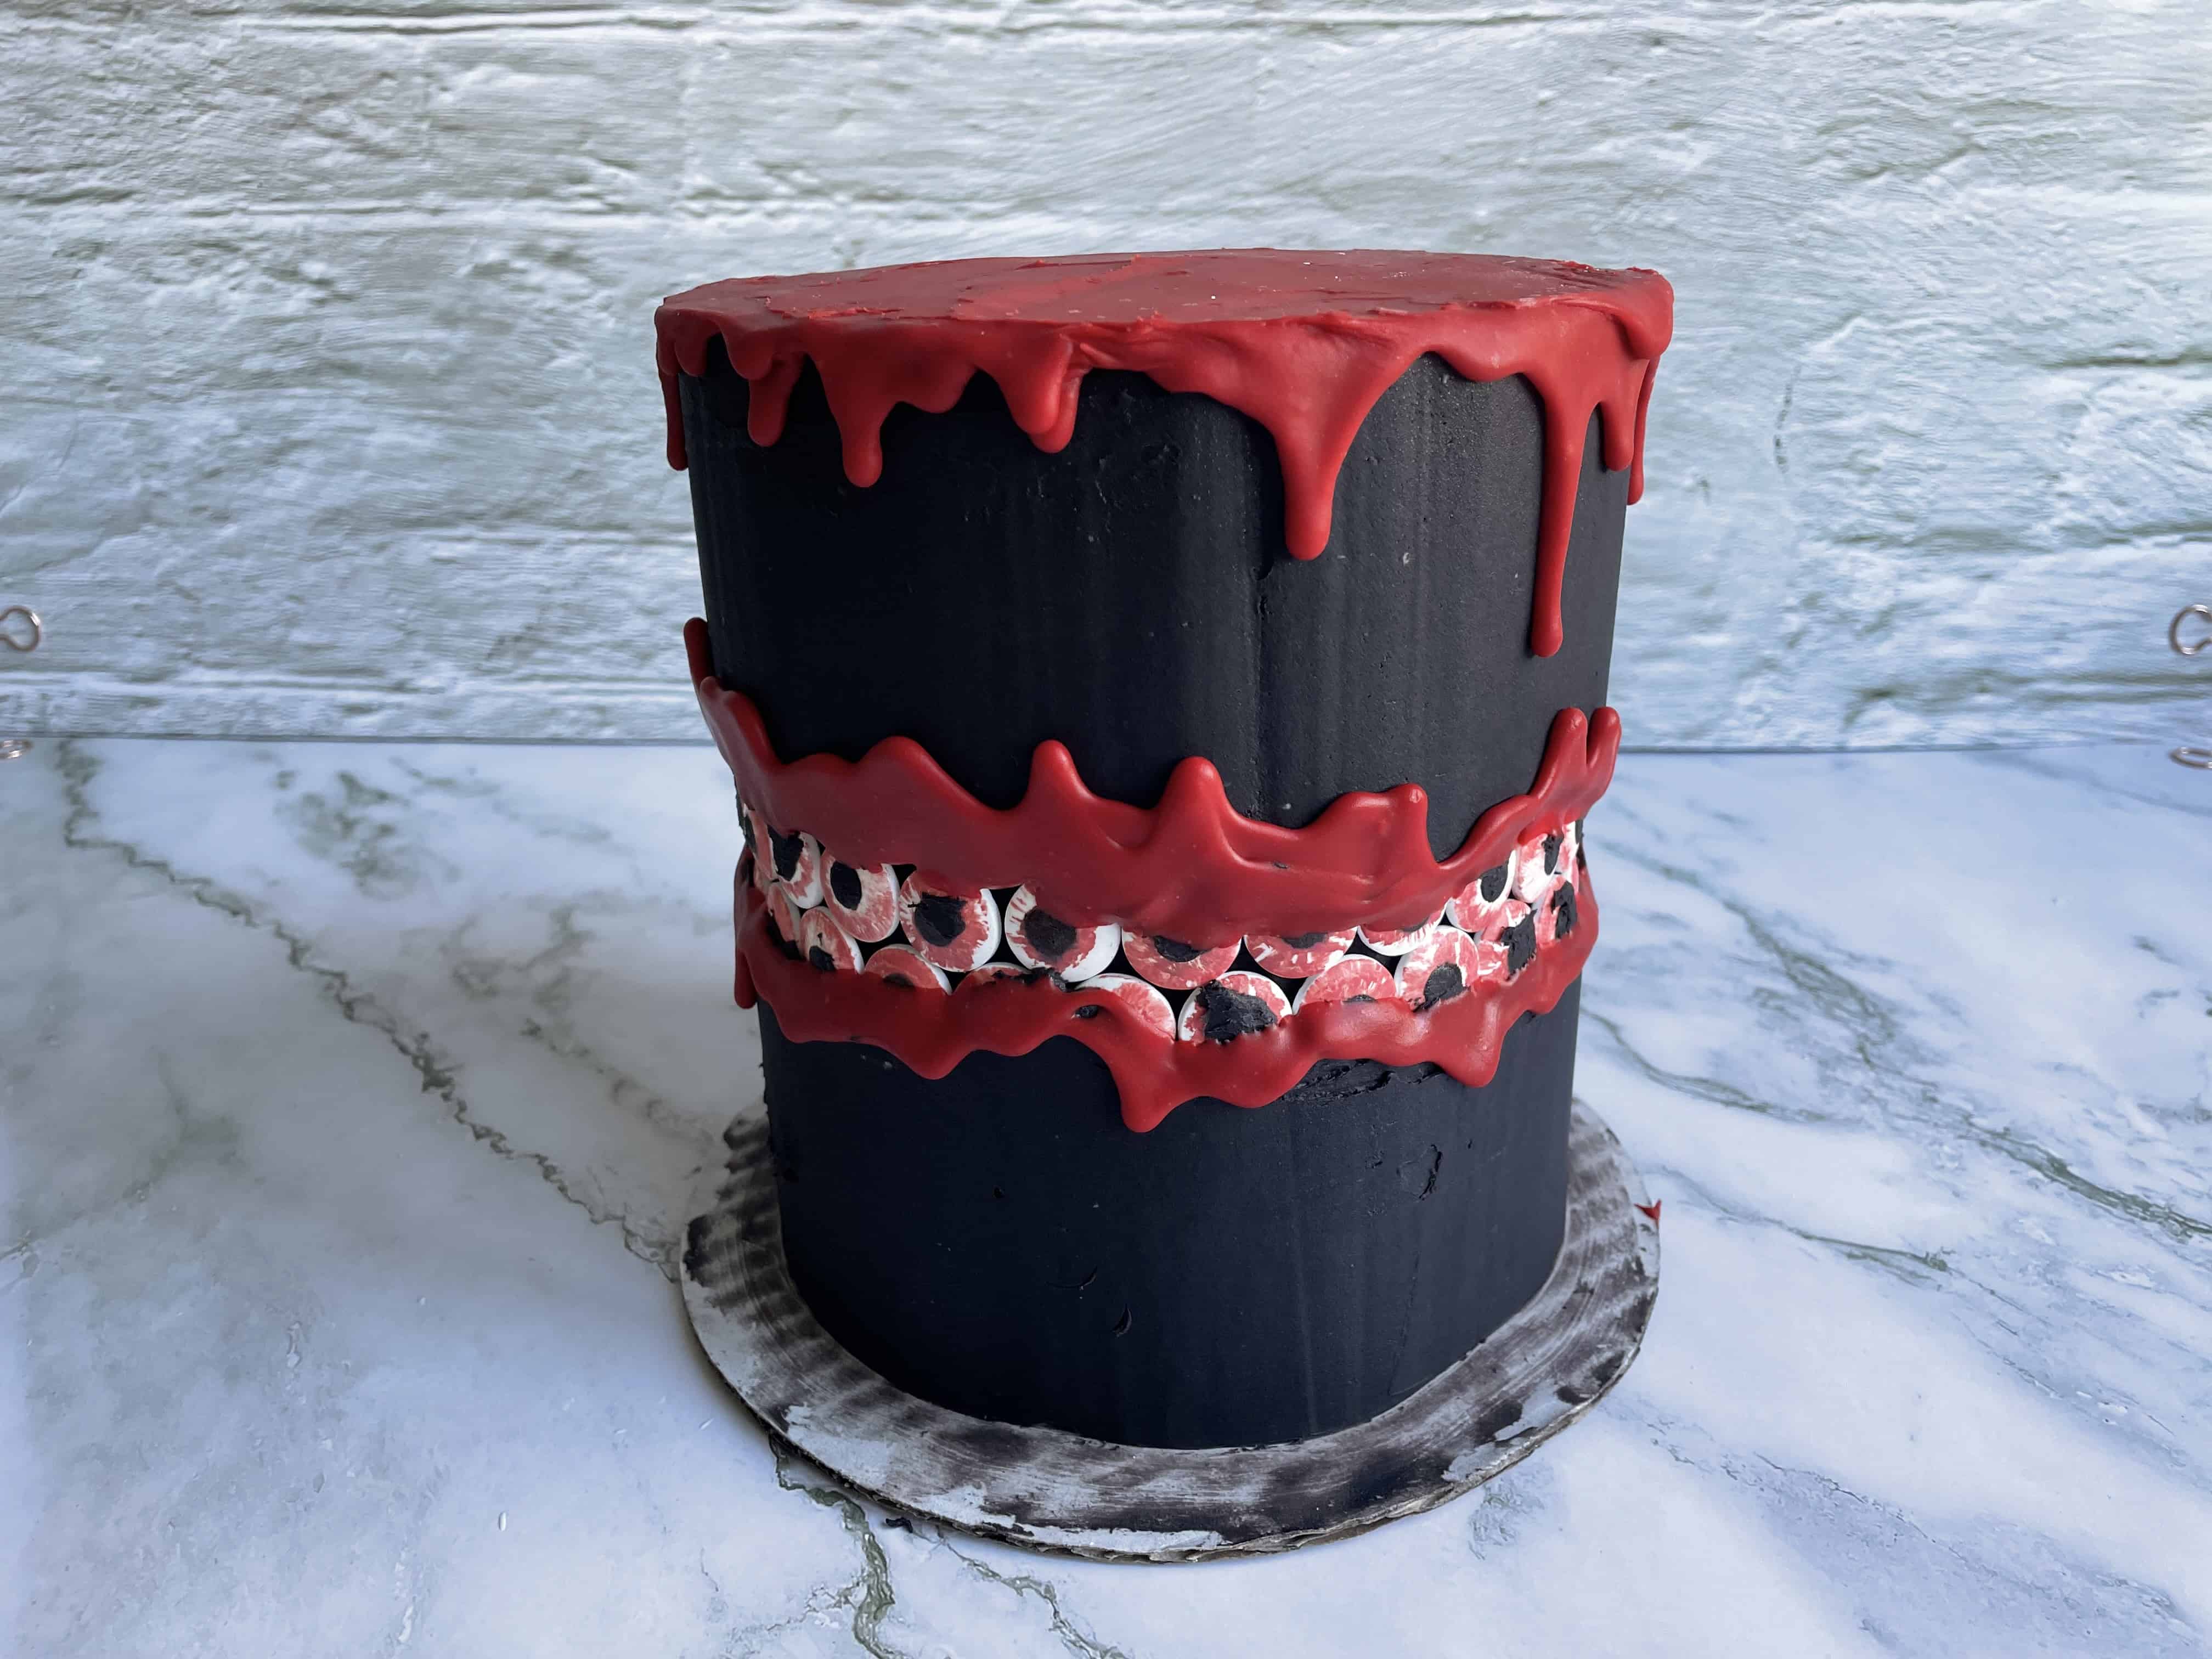
- Top off the cake. Once the cake drip has chilled and set, place the skulls in a circle on the top of the cake. Pipe additional frosting on top of the cake between skulls. Congrats! You're Halloween Oreo red velvet cake is now ready to go!
📖 Recipe
Oreo Red Velvet Cake with Black Cream Cheese Frosting
Ingredients
For the cake:
- ¾ c unsalted butter room temperature
- 2 ½ c granulated sugar
- 3 eggs room temperature
- 3 teaspoon vanilla extract
- 1 c vegetable oil
- 1 tablespoon white vinegar
- 1 ½ c buttermilk
- 4 ½ C cake flour
- 3 tablespoon unsweetened cocoa powder
- 1 ½ teaspoon baking soda
- ½ teaspoon salt
- 1 tablespoon red food coloring*
- 1 ½ c chopped oreos
For the Frosting:**
- 2 c unsalted butter room temperature
- 8 oz cream cheese softened
- ½ c black cocoa powder sifted
- 2 teaspoon vanilla extract
- 6 cups powdered sugar sifted
- 2 teaspoon Black food coloring
Instructions
For the Cake:
- Preheat oven to 350°F. Line 4-6” pans with parchment paper and spray with nonstick spray.
- In a stand mixer with paddle attachment, cream butter and sugar on medium speed.¾ c unsalted butter, 2 ½ c granulated sugar
- Add eggs, one at a time while continuing to beat. Add vanilla extract. Mix until smooth.3 eggs, 3 teaspoon vanilla extract
- Add vegetable oil, vinegar, and buttermilk. Mix until smooth.1 c vegetable oil, 1 tablespoon white vinegar, 1 ½ c buttermilk
- Sift together dry ingredients.4 ½ C cake flour, 1 ½ teaspoon baking soda, ½ teaspoon salt, 3 tablespoon unsweetened cocoa powder
- Slowly add dry ingredients to the mixer and beat until combined. Do not over beat.
- Add in red food coloring until you reach your desired shade of red. Fold in chopped Oreos.1 tablespoon red food coloring*, 1 ½ c chopped oreos
- Divide batter between pans and bake for 35-40 minutes or until toothpick comes out clean. Allow to cool before removing.
For the Frosting:
- Cream together butter and cream cheese in the bowl of a stand mixer with a paddle attachment.2 c unsalted butter, 8 oz cream cheese
- Add black cocoa powder continuing to mix until smooth. Add vanilla extract.½ c black cocoa powder, 2 teaspoon vanilla extract
- Slowly add sifted powdered sugar and beat until frosting is smooth.6 cups powdered sugar
- Add desired amount of black food coloring continuing to blend until well frosting has no lumps and is nice and smooth.***2 teaspoon Black food coloring


EvieJay says
Hi Aunt Andee! Cool cake, I love it!
Andee's Apron says
Thank you Evie!